drupal hit counter
Jerry Huang | apps and developing apps

Jerry Huang apps and developing apps

IP CAM Controller tutorial (Android): how to set up my camera

31. January 2013 14:08 by Jerry in Android, IP CAM


Add your first camera

Launching the app at the first time, it will automatically navigate to create new camera screen.

1) Choose a camera type most close to your IP Camera; sometimes you need to try all types of your brand, e.g. Foscam user is suggested to test each Foscam type in the app in order to find out which one work the best for you.

2) Type in a camera name you like.

3) If your camera is a DVR, you may need to input a camera no which is normally corresponding to stream no, channel no etc.

4) Hostname or IP address of your camera. In order to access your camera over the internet (e.g. a 3G network), you must use internet IP address, but not internal address like 192.168.1.x. This kind of address only work at home when you are connected to home WiFi.

5) The port no where your camera is hosted on. If your camera is behind a WiFi router, you will probably need to configure port forwarding on your router.

6) Type in username and password of your camera (not the router) and choose the quality and image resolution.

7) Tap the "save" button at the bottom of this screen.

Add more cameras

Tap the "+" icon to add another camera

Then you will enter the camera setup screen again, just do the same as you set up the first camera, and don't forget to tap the "save" button to save it.

Edit/Delete a camera

There is a menu icon on the right upper corner of each camera in main screen, tap on that and select "Edit Camera" to edit the camera; or "Remove Camera" to delete a camera.

There are some other options in this menu:

  • delete the selected camera
  • edit the camera
  • refresh the snapshot
    snapshot is not supported for all cameras, in case it's not supported for your camera, it will display the default camera icon
  • share camera access with friends and family. The app will generate an encrypted hyper link which you could send it to friends via SMS, email etc. The person who receive the link could open IP CAM Controller and view your camera instantly. This is extremely helpful when your friend has difficulty to set up the camera. Click here for more info about sharing. 

Grouping

 The grouping (or multi-view) icon will appear when you have more than 1 cameras, tap on that to add a new camera group

Editing a grouping is straightforward as below screenshot shows: 

IP CAM Controller tutorial: how to add/edit/delete camera

30. January 2013 20:34 by Jerry in IP CAM


Add your first camera

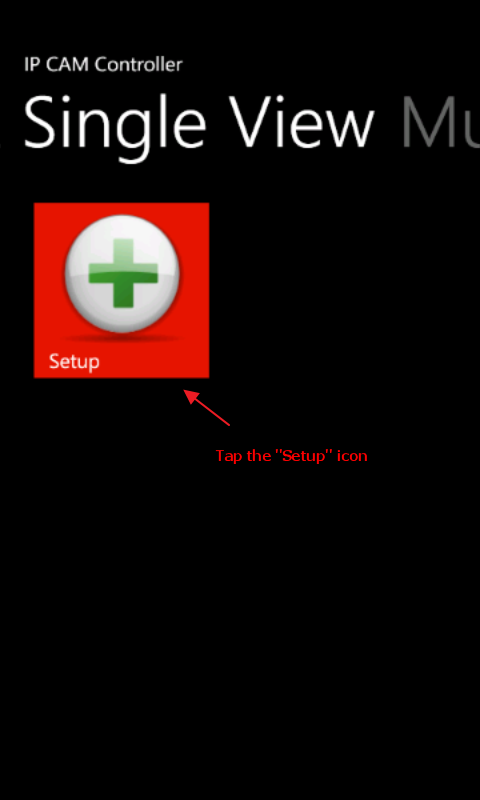
a) Tap the "Setup" icon in main screen
b) Input camera info and save it
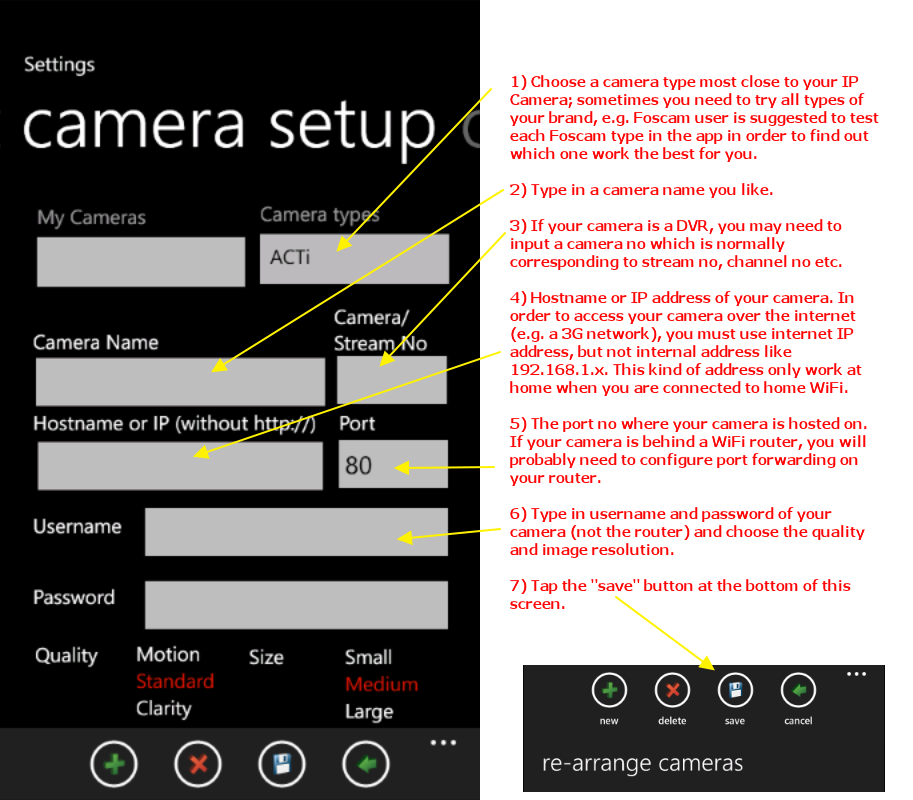
 

1) Choose a camera type most close to your IP Camera; sometimes you need to try all types of your brand, e.g. Foscam user is suggested to test each Foscam type in the app in order to find out which one work the best for you.

2) Type in a camera name you like.

3) If your camera is a DVR, you may need to input a camera no which is normally corresponding to stream no, channel no etc.

4) Hostname or IP address of your camera. In order to access your camera over the internet (e.g. a 3G network), you must use internet IP address, but not internal address like 192.168.1.x. This kind of address only work at home when you are connected to home WiFi.

5) The port no where your camera is hosted on. If your camera is behind a WiFi router, you will probably need to configure port forwarding on your router.

6) Type in username and password of your camera (not the router) and choose the quality and image resolution.

7) Tap the "save" button at the bottom of this screen.


Add the 2nd camera

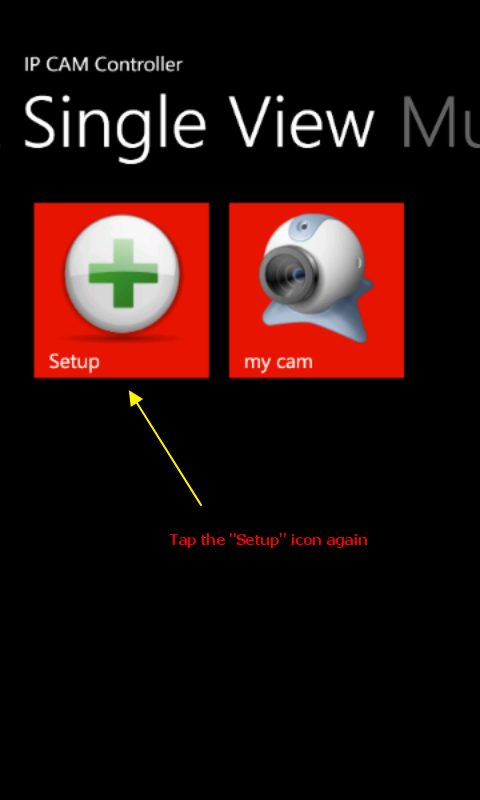
a) Tap the "Setup" icon again
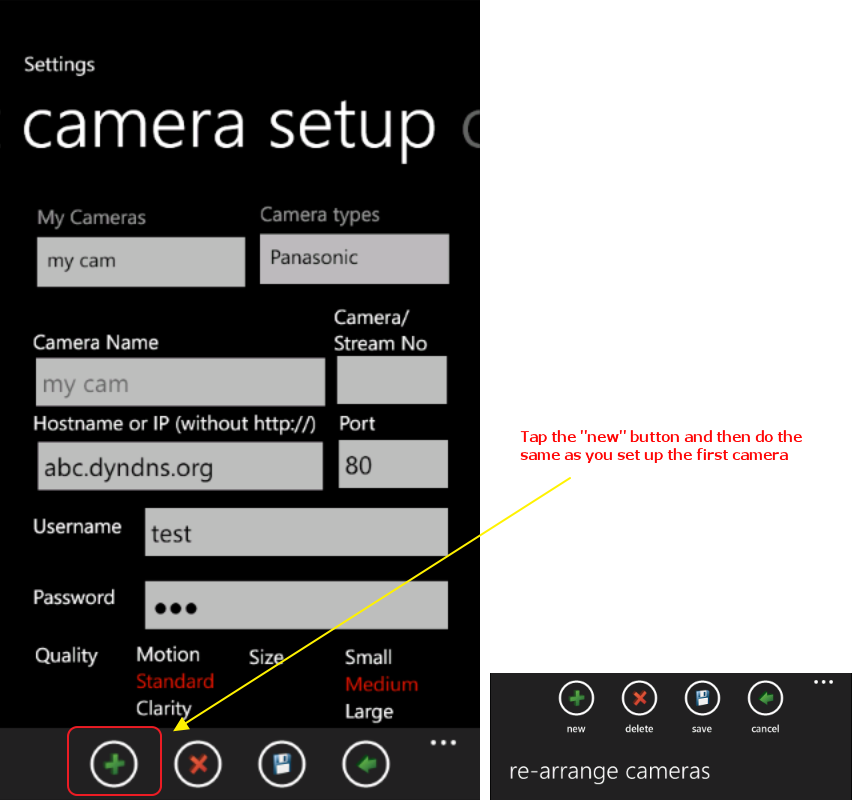
b) Tap the "new" button and do the same as you set up the first camera, and don't forget to tap the "save" button to save it
 

Edit a camera

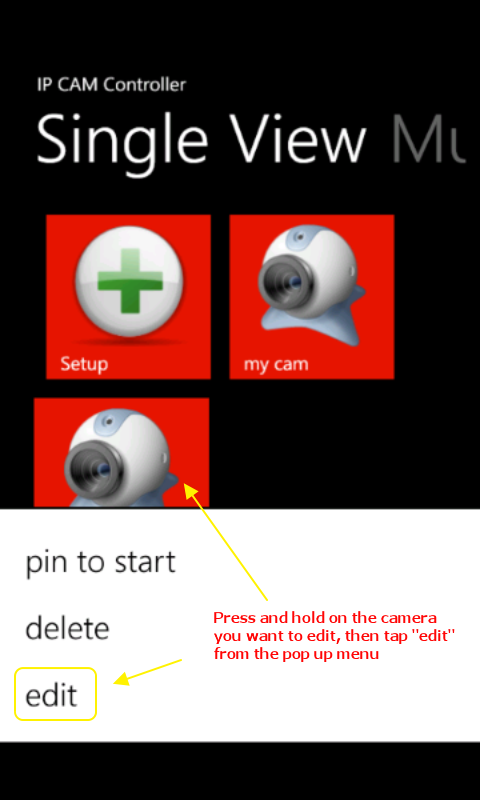
a) Press and hold on the camera you want to edit, then choose "edit" (this is new menu item from v2.5.3, older version please go to step c) from the pop up menu.


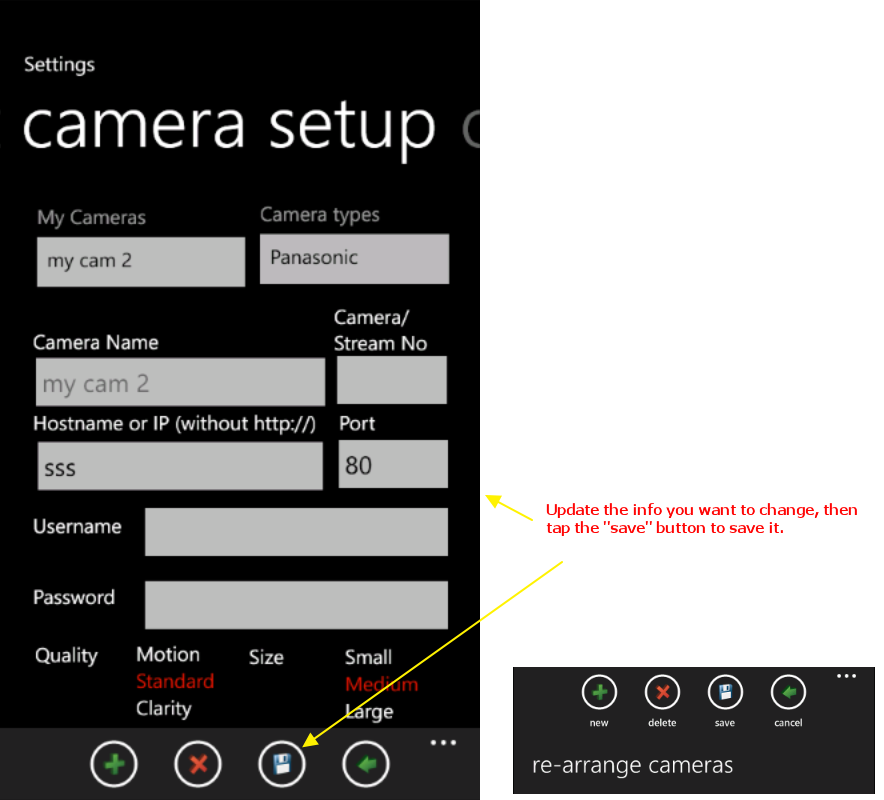
b) Update the camera info, then tap the "save" button 
 

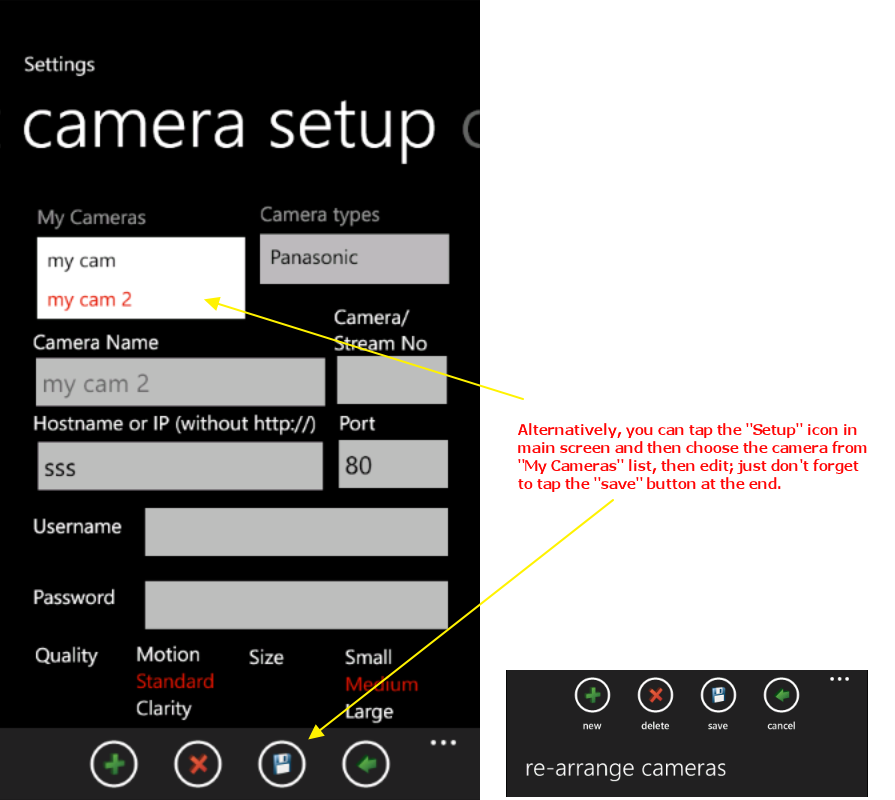
c) Alternatively, you can tap the "Setup" icon in main screen and then choose the camera from "My Cameras" list; then go ahead, but don't forget to tap the "save" button at the end. 
 

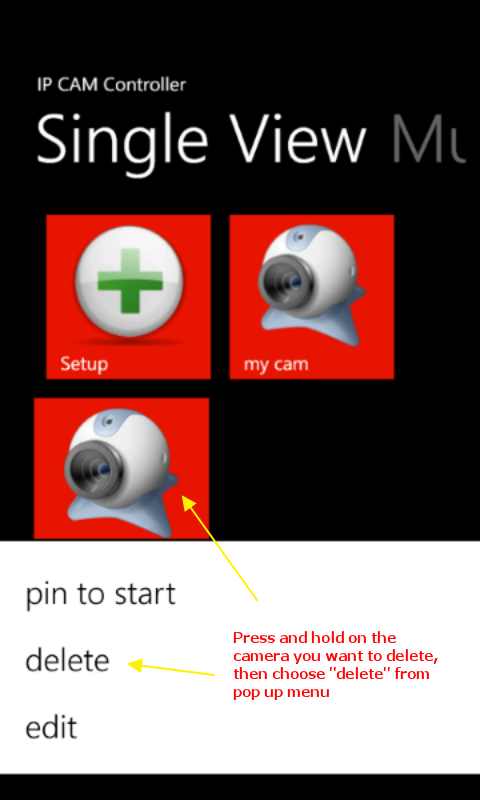
Delete a camera

Press and hold a camera in the main screen, then choose "delete" from pop up menu.
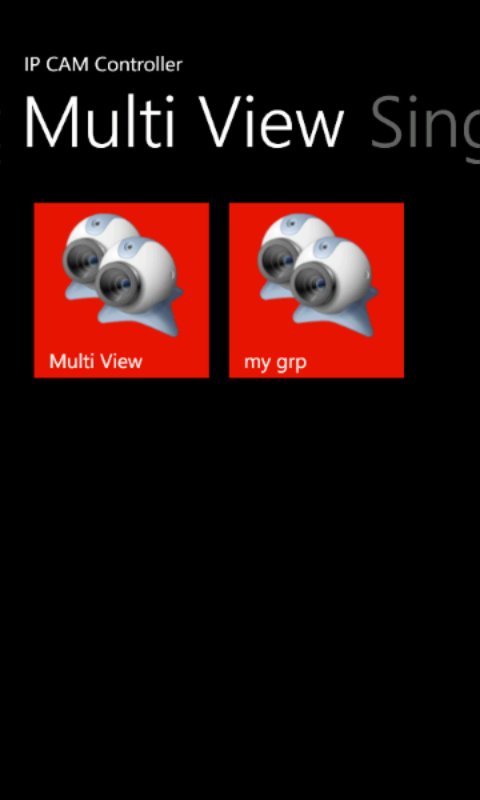
Add a multi-view grouping

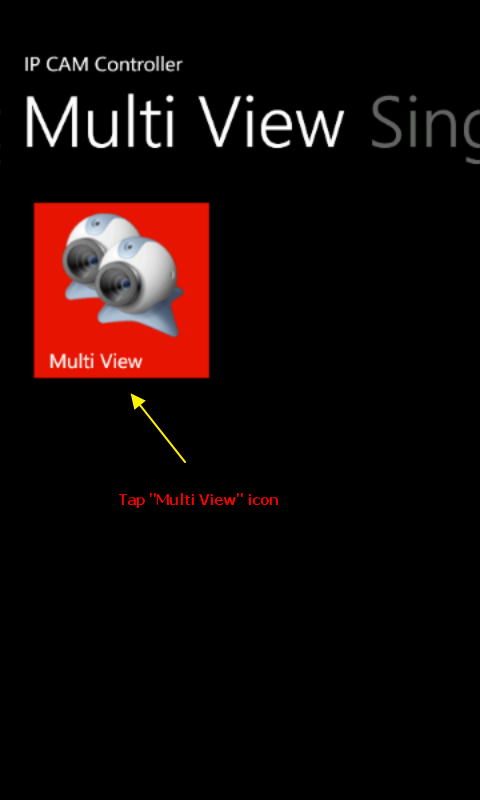
 a) Tap the "Multi View" icon in main screen
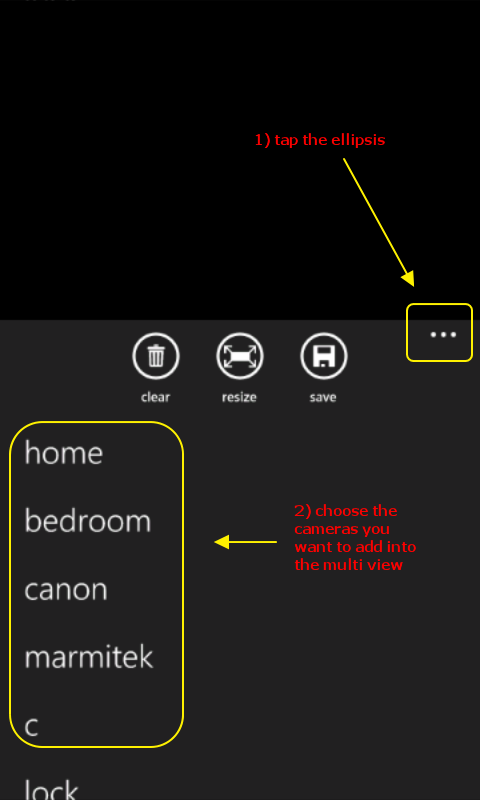
b) Tap the ellipsis (...) from bottom, then choose your cameras from the list
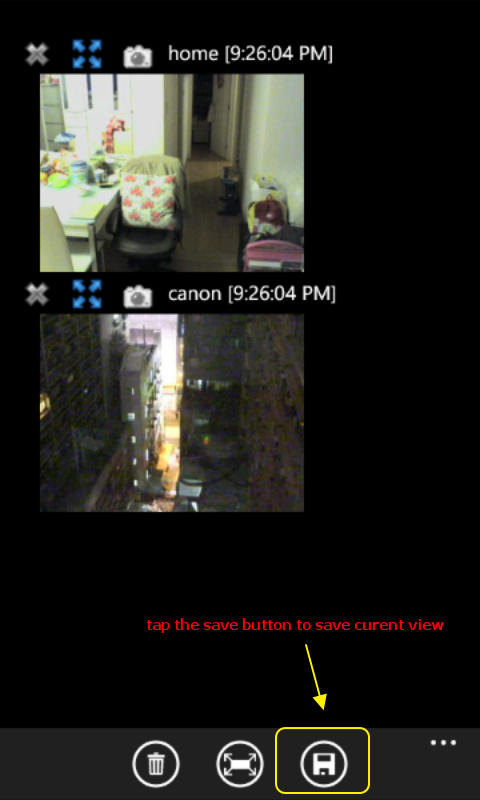
c) Tap the "save" icon (only for paid version, free trial could not save the view) 
d) Input a name for the grouping
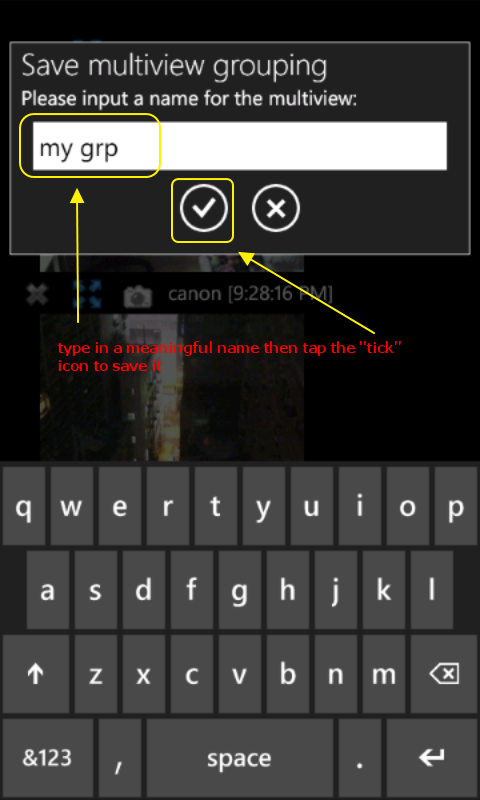
e) The view will then be saved for further usage
IP CAM Controller v1.2.76 is on Google Play.

4. November 2012 17:43 by Zexu in

1. Global floating camera view, you can keep an eye on your camera while doing other things. The floating window can be dragged to anywhere you want.


2. Share camera access with friends and family, you can share the access of your camera with a encrypted hyper link. On click on that link the app will open the camera view directly without going though any setup work. 


3. Share the snapshot of your camera with one click


Android app on Google Play

Get back your microsoft games in win8

3. November 2012 19:43 by Jerry in
  1. Copy all files and sub folders in "Microsoft Games" from old system backup, which in my case locates at: C:\Windows.old\Program Files\Microsoft Games
    to C:\Program Files\Microsoft Games
  2. copy old backup C:\Windows.old\Windows\System32\CardGames.dll to
    C:\Program Files\Microsoft Games\FreeCell
    C:\Program Files\Microsoft Games\Solitaire
    C:\Program Files\Microsoft Games\SpiderSolitaire
    C:\Program Files\Microsoft Games\Hearts
  3. Download the Microsoft Games Patcher 1.2 from http://rghost.net/37573001 (please ignore any warning from anti-virus software such as Windows Defender)
  4. Run and apply the patch

Ref: http://forums.mydigitallife.info/threads/33214-How-to-use-Microsoft-Games-from-Windows-7-in-Windows-8

IP CAM Controller v2.5.1 is now on Windows Phone store

2. November 2012 20:16 by Jerry in IP CAM, Windows Phone

The new version (BTW Microsoft finally support 4 digits version numberLaughing) contains a new function - to share your camera's snapshot to social networks (Facebook and Twitter at the moment). How to do it? Pretty simple...

1) tap the share button (the 4th button at the bottom)


2) Choose which social network you would like to share


3) One off: if this is the first time you choose the social network, you will need to input your username and password of Facebook (in this case) and authorized my app to post update on behalf of you


4) then input the message (a.k.a status update), and share


Translation between WP and Win8 Metro series: loading byte array into BitmapImage

1. November 2012 14:07 by Jerry in C#, Win8 Development, Windows Phone Development

WP

[code language=C#]
byte[] frameBuffer;
BitmapImage.SetSource(new MemoryStream(frameBuffer, 0, frameBuffer.Length));
[/code]

Win8

[code language=C#]
 var ms = new Windows.Storage.Streams.InMemoryRandomAccessStream();
                        ms.AsStreamForWrite().Write(frameBuffer, 0, frameBuffer.Length);
                        ms.Seek(0);
                        BitmapImage.SetSource(ms);
[/code]

it looks to me that Win8 just making thing complicated:(

Translation between WP and Win8 Metro series: async anonymous method in Win8

1. November 2012 13:48 by Jerry in C#, Win8 Development, Windows Phone Development

As I mentioned previously, I'm trying to develop a Win8 Metro version of IP CAM Coontroller, so I'm basically translating the WP coding into Win8. I'm going to post a series of blog post to record (and so benefit those googler with same problem) some of the interesting issue and topic.

WP coding:

[code language=C#]
Deployment.Current.Dispatcher.BeginInvoke(() =>
                        {
                            //do something here
                        }
                        );
[/code]

WIN8

[code language=C#]
 Windows.ApplicationModel.Core.CoreApplication.MainView.CoreWindow.Dispatcher.RunAsync(
                Windows.UI.Core.CoreDispatcherPriority.Normal,
                new Windows.UI.Core.DispatchedHandler(() =>
                {
                    //do something here
                }));
[/code]

This is not end of the story, by using the RunAsync like above, you will get a compiler warning from VS2012, and it's interesting that if you assign the returning result (of RunAsync) to a variable, the warning goes away. So the final version is like:

[code language=C#]
 var dummy = Windows.ApplicationModel.Core.CoreApplication.MainView.CoreWindow.Dispatcher.RunAsync(
                Windows.UI.Core.CoreDispatcherPriority.Normal,
                new Windows.UI.Core.DispatchedHandler(() =>
                {
                    //do something here
                }));
[/code]

Critical stopshower in Win8 store app development

1. November 2012 10:57 by Jerry in

Every upgrade from Microsoft is a nightmare! more or less...

I'm currently investgating the possibility of making a Windows 8 Metro version of my IP CAM Controller app. And what it turns out is not so pretty. Some developer already found out the issue a while back this year:

https://connect.microsoft.com/VisualStudio/feedback/details/737000/the-server-committed-a-protocol-violation-is-unoverridable-in-metro-style-apps

I'm encounterring the same and it's much much worse in my case, because what I'm dealing with is a bunch of HTTP servers implemented by various manufacturers that don't give a shit about Windows 8's world and they have their reasons - this has been working all the time, why just win8 can't?

Without enabling the useUnsafeHeaderParsing somehow, I don't think we can make any IP camera app unless we write our own HTTP component with raw socket, but Microsoft really expect us to do that? seriously?

IP CAM Controller v2.5 for Windows Phonoe released

11. October 2012 08:14 by Jerry in IP CAM, Windows Phone

Multi-View has been enhanced from this version, and free to use for trial users (while the new grouping functionis for paid version only).

How to use:

1) tap "Multi View" icon

2) select cameras you would like to put into your view

3) tap save button (at bottom) and enter a name to save current grouping

4) done

Note:

  • Multi View is mainly for people who own many (at least more than 1, obviouslywink) camera, with which you are able to view multiple cameras in one screen at the same time. You can even control each of them by tapping on image from this view!
  • Grouping is even more powerful if you want to have different views for different group of cameras, e.g. a view for cameras in building #1 another for building #2, etc.