drupal hit counter
Jerry Huang | Windows Phone

Jerry Huang apps and developing apps

Nuova funzione di condivisione per WP e WinRT

5. September 2014 23:28 by BBSYSTEM.IT in IP CAM, Windows Phone, Windows Store


Con l'aggiornamento per  WP8 (v3.3.5) e WinRT (v1.3), le impostazioni di una telecamera possono essere condivise tra queste due piattaforme software, sia tramite linkche file allegato. Guarda l'esempio successivo:


Sul tuo tablet, attiva il pulsante che trovi nella modalità di visione singola telecamera, quindi scegli "Share via File" (oppure  Share via Link, se preferisci)


Una finestra di condivisione si aprirà nel lato destro: 

Scegli Email per mandare il file come allegato; effettivamente, se avrai installate altre app che possano condividere, ci saranno più opzioni di scelta.


Dopo questo, proprio come per mandare una classica mail, potrai digitare un messaggio per il ricevente. Non dimenticare di cliccare sul pulsante "invia" nell'angolo in alto a destra! :-)

Tramite IP CAM Controller preventivamente installato nel telefono o tablet del ricevente, semplicemente aprendo l'allegato, IP CAM Controller sarà in grado di leggere il file criptato e aprire una schermata di visione immediatamente. Con questa caratteristica, il ricevente non avrà bisogno di inserire tutte le configurazioni relative alla tua telecamera (come per esempio indirizzo IP, porta, credenziali di accesso, ecc), tutto ciò sarà all'interno del piccolo file che avrai inviato. 


Nota bene per usare "share via Link"

La funzione "share by link" funziona similare eccetto che le informazioni della telecamera sono all'interno di un Hyper link. Il link successivo mostra come è strutturato:

ipcamcontroller:view?v=4&cam=xxxxxxxxxxxxxxxx

Ci sono due parametri critici da considerare:

v=4: versione 4 che è la più nuova da tempo;

cam=... : per differenti versioni, funziona in maniera leggermente differente. Per la versione 4 , è una  URL più corta come http://goo.gl/abcdefgh; per la versione 3, il valore della telecamera è una stringa veramente lunga, normalmente oltre 600 caratteri.

La versione per telefoni supporta tutte le versioni, mentre quella per WinRT solo la versione 4

Modalità sensore: muovi il telefono e muovi la telecamera (PTZ)

5. September 2014 23:04 by BBSYSTEM.IT in Android, IP CAM, Windows Phone, Windows Store

Una Nuova interessante maniera per controllare la tua telecamera è stata introdotta in una delle ultime versioni: modalità sensore. Dopo aver attivato la funzione la telecamera potrà essere mossa tramite l'accelerometro presente nel tuo device!

Cliccando sul pulsante "direzione" per attivare il sensore, tenendo il tuo device orizzontale, quando orienterai il telefono da una certa parte la telecamera ti seguirà in quella direzione. Il video precedente fa vedere il funzionamento su WP8, questa nuova funzione lavorerà nella stessa maniera anche in altre piattaforme (Android, WinRT). Su Android, per attivarla, cliccare sull'icona della bussola, come mostrato nella figura:


Questo è interessante e può essere esteso a molte possibilità... Immagina per esempio di posizionare il tuo telefono su qualcosa in continuo movimento e quindi attivare una specie di movimento di ronda automatica alla tua telecamera. Un altro esempio, su una macchina telecomandata, puoi a sua volta muovere una telecamera PTZ .. :-)


The new share feature in WinRT and WP versions

15. April 2014 12:27 by Jerry in IP CAM, Windows Phone, Windows Store

With latest update for WP8 (v3.3.5) and WinRT (v1.3), a camera setting could be shared between these 2 platforms, with either a link or a file attachment. See follow scenario as a sample:


On your tablet, activate bottom command bar in single view screen, then choose "Share via File" (or Share via Link if you like)


A share charm will be showing on the right hand side:


Choose Email to send the file in email attachment; In fact, if you had installed other app with file-sharing ability, there will be more options there.


After that, just like sending a regular email, you can type in extra info for the recipient. Just don't forget to tap the "send" button on the right upper corner:)


With IP CAM Controller installed on recipient's phone or tablet, simple open up the attachment, IP CAM Controller is able to read the encrypted content from file and open a view screen immediately. With this approach, the recipient doesn't need to input any configuration about your camera (such as IP, port, credentials, etc), they are all inside the small file you sent over.


Note for using "Share via Link"

The share by link is working similar except that the camera info is inside a hyper link (aka deep link). The link following this format:

ipcamcontroller:view?v=4&cam=xxxxxxxxxxxxxxxx

There are 2 critical parameter here:

v=4: version is 4 which is the newest version number by far;

cam=... : for different version, it works quite differently. For version 4 specifically, it's a shorten URL like http://goo.gl/abcdefgh; for version 3, the cam value is a very long string which normally over 600 characters;

The phone version supports all versions while the WinRT only support version 4.

Translation to Italian - Grazie Germania!

17. September 2013 20:54 by BBSYSTEM.IT in IP CAM, Windows Phone

Gli Stati Uniti sono stati il principale mercato per tutti i maggiori Stores (per esempio APPLE, Google e Microsoft WP). Per questo ovviamente gli Stati Uniti sono in testa come numero di download della mia applicazione (è ancora così); lo stesso vale per la versione su Android. Recentemente è stato superato dalla Germania! Che sorpresa!

Il numero di downloads dalla Germania ha cominciato a salire vertiginosamente dal momento della nuova versione tradotta in Tedesco. Insieme alla crescita di download è arrivata anche una crescita di impressioni positive. Vi sono veramente riconoscente! Vorrei poter scrivere questo intervento in tedesco ma non ne sono capace. In ogni caso, per tutti gli utenti dalla Germania, vi prego di accettare la mia gratitudine, GRAZIE!!   E, uno speciale ringraziamento va a Pascal Künzli volontario traduttore. E’ stato un piacere lavorare con lui.


Un'altra grande novità è su Windows Phone :)

Dal 1 ° settembre, IP CAM controller per WP8 è stato selezionato per essere evidenziato in Brasile, Spagna e Italia

Vediamo uno dei messaggi di posta elettronica 


E se sarà per  2 giorni evidenziato sullo Store Italiano i giorni Settembre 03-04, il merito va ad Andrea Busato da BBSystem.it, che è il nostro traduttore italiano sia per Android che per WP


Tradotto da BBSYSTEM.IT

Thank you German!

2. September 2013 15:42 by Jerry in Android, IP CAM, Windows Phone

US has been the biggest market in basically all major app stores (i.e. Apple, Google and Microsoft's WP market). And so naturally US is the top country in download number of my app on WP market(it still isWink); it was the same for Android. But recently it had been exceeded by German! What a surprise!

The downloads from German started to grow dramatically right after we released the Germany language support in the app. Along with the increment in number, positive reviews are also growing. I'm so much grateful! I wish I could even write this blog in Germany but unfortunately I can'tFrown. Anyhow, for all people from German, please accept my sincere appreciation, THANK YOU!! And, a special thank-you goes to Pascal Künzli who was the voluntary translator. It has been totally a pleasure to work with himLaughing


Another great news is about Windows Phone:) Since September 1, IP CAM Controller for WP8 had been selected to feature in Brazil, Spain and ItalyCoolTongue OutLet's see one of the emails


And it's going to be 2 days on Italy market from Sept 3 to 4, credit goes to Andrea Busato from BBSystem.it, who is our Italian translatorKiss for both Android and WP

IP CAM Controller 3.2: Motion Detection - baby monitor

1. September 2013 18:26 by Jerry in IP CAM, Windows Phone

Apart from regular bug fixing and minor improvements, the new release (v3.2) of IP CAM Controller is mainly about adding a motion detection mode in single view screen. With this feature in place, you are able to turn your phone into a baby monitor - when motion is detected, the phone will play alarm audio and vibrate to attract your attention.

After activating the motion detect mode, you can adjust the sensitivity of the detection as well as the threshold to trigger alarm. In case movement is detected in the video, the movement will be highlighted in red, just like above screen shows. When the motion state reach the configured threshold in a certain level (e.g. exceed a certain time in a few seconds), the alarm is trigger - the phone will play a sound effect and vibrate as well (they can be switched in setting screen though).


A few important things to note:

  • As motion detection is based on a series of calculation, this function will consume a lot of power, so it's HIGHLY recommended to plug in power before use (if you intend to monitor for a long period of time).
  • Not only power usage, this feature also require a lot of CPU usage and so with this mode turn on, the UI will become a bit "laggy" i.e not so smooth, as a lot of stuff happening at the background. As a result, although other functions remain accessible but it's not suggested to do any PTZ actions before switch off motion detection.
  • Image quality will be poor in this mode in order to speed up the whole process, which make sense in my opinion, since this mode is mainly about detecting movement. You can switch back to normal mode whenever your eyes are back on screen.Cool
  • Free trial is offered for 5 minutes after activating the function, when time is up, you can go back to main screen and enter the viewer screen again to get another 5 minutes. Alternatively, you can support my development by paying the app at $1.99 to remove this limitation (it will also remove advertising and limitation on grouping)Kiss

 What next? Probably and hopefully monitor the volume in audio, we will see:)


Italian Translation:

Oltre a sistemare piccoli bug e aggiungere miglioramenti vari, la nuova versione(v3.2) di IP CAM Controller è soprattutto l’aggiunta della modalità motion detection nella visione singola. Con questa funzionalità, potrai far diventare il tuo telefono un babymonitor – quando sarà rilevato il movimento, il telefono riprodurrà un suono e vibrerà per attirare la tua attenzione.

Dopo aver attivato il motion detection, potrai regolare la sensibilità al meglio, come per la soglia di allarme. In caso di movimento rilevato sul video, il movimento sarà evidenziato in rosso, come mostrato nella figura sopra. Quando il movimento raggiungerà la soglia fissata in un certo livello (per esempio superandolo per qualche secondo), l’allarme sarà lanciato – il telefono quindi suonerà e vibrerà (possono essere regolati nelle impostazioni).


Alcune importanti cose da sapere:

  • motion è calcolato in base ad una serie di calcoli,  consumerà parecchia potenza, per cui è CALDAMENTE consigliato di collegarlo al caricatore prima dell’uso (se intendi utilizzarlo per lunghi periodi)
  • Non solo corrente, Motion richiede molto uso della CPU ed è per questo che quando attivo, la visione a schermo apparirà leggermente lenta e non così bella, dovuto ad una quantità di elaborazioni in background. Comunque le altre funzioni rimangono accessibili ma è consigliato di non compiere azioni con le PTZ prima di aver spento la funzione di motion detection.
  • La qualità dell’immagine sarà povera al fine di velocizzare l’intero processo, che ha senso secondo me, perché questa funzione è prevalentemente usata per rilevare il movimento. Sarà possibile comunque tornare alla normalità quando potrai tenere gli occhi sullo schermo in maniera più costante.Cool
  • La versione trial offre 5 min di servizio, quando il termine è raggiunto,  potrai tornare indietro e rientrare nella funzione per altri 5 minuti. In alternativa, potrai supportare il nostro lavoro pagando 1,99$ per rimuovere questa limitazione (verranno tolte anche le pubblicità e la limitazione sul numero di gruppi)Kiss

Cosa abbiamo in mente per il futuro? Probabilmente spero monitorare il volume dell’audio, vedremo :-)

Tradotto da BBSYSTEM.IT

How to set up camera and grouping v 3.1 and above - WP

8. August 2013 09:58 by Jerry in IP CAM, Windows Phone


Add your first camera

a) Tap the "add" button in main screen

b) Input camera info and save it


1) Choose a camera type most close to your IP Camera; sometimes you need to try all types of your brand, e.g. Foscam user is suggested to test each Foscam type in the app in order to find out which one work the best for you.

2) Type in a camera name you like.

3) If your camera is a DVR, you may need to input a camera no which is normally corresponding to stream no, channel no etc.

4) Hostname or IP address of your camera. In order to access your camera over the internet (e.g. a 3G network), you must use internet IP address, but not internal address like 192.168.1.x. This kind of address only work at home when you are connected to home WiFi.

5) The port no where your camera is hosted on. If your camera is behind a WiFi router, you will probably need to configure port forwarding on your router.

6) Type in username and password of your camera (not the router) and choose the quality and image resolution.

7) Tap the "save" button at the bottom of this screen.


Add the 2nd camera

a) Tap the "add" button again

b) Then do the same as you set up the first camera, and don't forget to tap the "save" button to save it


Edit a camera

a) Press and hold on the camera you want to edit, then choose "edit" (this is new menu item from v2.5.3, older version please go to step c) from the pop up menu.


b) Update the camera info, then tap the "save" button 


Delete a camera

Press and hold a camera in the main screen, then choose "delete" from pop up menu.

Add a multi-view grouping

 a) Tap the "add" button in main screen (Multi View section)

b) Tap the ellipsis (...) from bottom, then choose your cameras from the list

c) Tap the "save" icon (only for paid version, free trial could not save the view) 

d) Input a name for the grouping

e) The view will then be saved for further usage

IP CAM Controller 3.0 and above: how to share camera link to family member

22. June 2013 21:29 by Jerry in IP CAM, Windows Phone

In the latest 3.0 release, a "share camera" via deep link function has been introduced (Android version has the same feature). The main purpose of this function is to send an encrypted hyper link (aka deep link in WP's world) to a close friend (such as your wife/husband or your parent) who has very little knowledge about setting up camera on the phone. The recipient requires to have a Windows Phone 8 and installed my app beforehand.


Step 1: 

In the single viewer screen, tap the 4th button at the right-down corner:

 A pop up menu will shows up

Choose "share camera" from the menu

Step 2:

Choose the way you would like to send the link:


In this case, let's choose Email. After tapping the "Send by Email", it will prompt the phone's email app, if you have configured more than one email accounts, you will need to choose which account you would like the message sending from.

Step 3:

Send out the message.


Recipient:

 The email message at receiver's mailbox will look like this:

Just simply tap on the link, the phone will activate my app to view the camera directly (again, IP CAM Controller must be installed first)


Is that it? Not just yet! By tapping the 4th button again, and choose "save camera" from the menu, your recipient is able to save the camera so that he/she doesn't need to tap the link every time in order to view your camera.

IP CAM COntroller 3.0 and above: edit camera and grouping

22. June 2013 12:46 by Jerry in IP CAM, Windows Phone


Add your first camera

a) Tap the "settings" button in main screen

b) Input camera info and save it


1) Choose a camera type most close to your IP Camera; sometimes you need to try all types of your brand, e.g. Foscam user is suggested to test each Foscam type in the app in order to find out which one work the best for you.

2) Type in a camera name you like.

3) If your camera is a DVR, you may need to input a camera no which is normally corresponding to stream no, channel no etc.

4) Hostname or IP address of your camera. In order to access your camera over the internet (e.g. a 3G network), you must use internet IP address, but not internal address like 192.168.1.x. This kind of address only work at home when you are connected to home WiFi.

5) The port no where your camera is hosted on. If your camera is behind a WiFi router, you will probably need to configure port forwarding on your router.

6) Type in username and password of your camera (not the router) and choose the quality and image resolution.

7) Tap the "save" button at the bottom of this screen.


Add the 2nd camera

a) Tap the "settings" button again

b) Tap the "new" button and do the same as you set up the first camera, and don't forget to tap the "save" button to save it


Edit a camera

a) Press and hold on the camera you want to edit, then choose "edit" (this is new menu item from v2.5.3, older version please go to step c) from the pop up menu.


b) Update the camera info, then tap the "save" button 


c) Alternatively, you can tap the "Setup" icon in main screen and then choose the camera from "My Cameras" list; then go ahead, but don't forget to tap the "save" button at the end. 


Delete a camera

Press and hold a camera in the main screen, then choose "delete" from pop up menu.

Add a multi-view grouping

 a) Tap the "settings" button in main screen (Multi View section)

b) Tap the ellipsis (...) from bottom, then choose your cameras from the list

c) Tap the "save" icon (only for paid version, free trial could not save the view) 

d) Input a name for the grouping

e) The view will then be saved for further usage


WP8: IP CAM Controller 3.0 FAQ

21. June 2013 21:40 by Jerry in IP CAM, Windows Phone

Audio was the top demanded feature for most users, after more than 1 year's investigation and months coding, I finally find a way to work this around. I'm very pleased to announce that IP CAM Controller 3.0 for WP8 with audio for selected cameras is finally launch!! For a completed and latest list that which camera supported audio, please click here


I received a few early feedback (mostly about audio and payment), some suggestions are awesome and I will make them happen in the near future (I promise:). Since the WP market doesn't allow me to reply (unlike Google) to review and comment, so I decided post my reply here and hopefully some of the users could read it.


Q1: I already paid for the app in your previous version, how come it's showing demo in the new version?

The app on your phone is still paid status, it still has all the paid features (ad is gone and no limitation on grouping) you used to have. From 3.0 version, I introduced the so-called camera specific Advanced Features in app products which is a series premium functions require a little extra money. It's like unlocking an episode in a game. Please kindly understand that this is the way to support my development and so keep this app continue.

Q2: How does the demo mode work? What the difference between paid and un-paid?

Audio is the most featured premium function for now (2 way audio might be the next one), you can enjoy 90 seconds of free trial every time you enter the single view, when time is up, audio will be disconnected (although you can go back and tap the camera again to have another 90 seconds). After you purchase the specific camera, you are entitled to unlimited audio (and so other advanced functions).

Q3: How do I purchase

In the single viewer screen, tap the 4th button (with name "featured") at right-down corner,

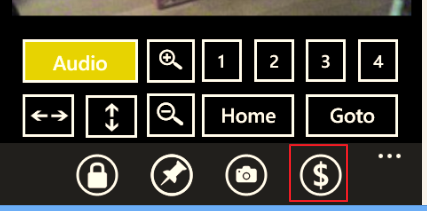
After successful payment, the icon will change to:


After that, a series of featured functions (depending what camera you have, I have different support for different camera) will then be showing up.


Then select the first menu item from the bottom (in the current version the wording is Unlock xxxx). It will display your camera product name here. If your camera is Foscam, it will say Buy Foscam (please note current market version will say Unlock Foscam). After tap this menu, it will lead you to the Windows Store purchase system for payment.

Q4: I have several Foscam cameras, do I need to pay each of them in order to use audio?

No. You just need to pay once, even with different foscam types. The idea is to categorize products by camera brands (not specific model/submodel), once foscam type is purchased you are entitled to all foscam cameras' advanced feature, same to other brands.

Q5: If I have a Foscam and a Panasonic, do I need to pay twice if I want audio for both of them?

Unfortunately yes. This is because I have been putting efforts for different types of camera, most of cameras work completely different in terms of audio. As a result, I have to customize the implementation for different brands and therefore comes the charge.

Q6: If in the future you release 2 way audio support, do I need to pay again?

For 2 way audio support, it will be binding into existing advanced features, in other word, no extra payment is required if this feature is added. Actually I will be focusing on those camera with audio supported, to add more Advanced Features (like switching light or infrared, etc), and those features will be binding to existing paid products as well.

Q7: Do I need to buy the app first before purchasing Advanced Features of my camera?

No. Buying the app will enable you to unlock the limitation of multiview grouping and the number of camera you can save, as well as removing ad. If you are fine with these restriction, you don't need to buy the app itself.